SOLIDWORKS RX Problem Capture Steps
Creating an Rx Capture
The information on this page is adapted from https://www.gsc-3d.com/blog/collect-rx-logs-files-for-technical-support-resolve-your-solidworks-issue/
It was originally written by Evan Hicks.

Evan Hicks
Anytime there is an issue in SOLIDWORKS that you can reproduce using a specific workflow, the SOLIDWORKS Rx problem capture tool can be helpful in documenting the issue. It allows you to take a screen recording as you walk through the steps that reproduce the issue, and it also collects settings, logs, and other background files.
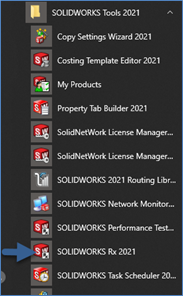
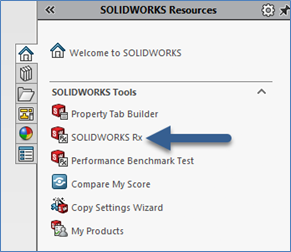
1. To begin, open SOLIDWORKS Rx from either the Windows Start Menu (SOLIDWORKS Tools > SOLIDWORKS Rx) or within SOLIDWORKS on the Right Task Pane.
2. Select the Problem Capture tab and select Record Video.
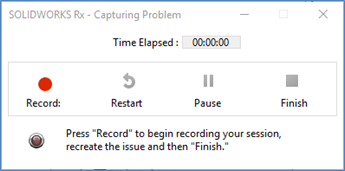
3. Click Record to start recording, demonstrate the issue, and then click Finish.
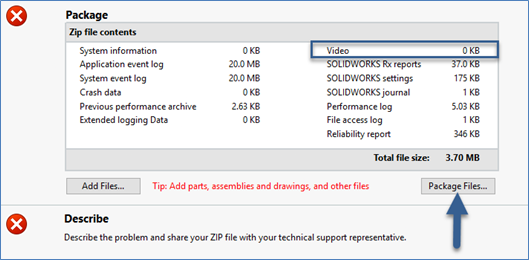
4. After completing the recording, it may take a minute for the video to compile so please be sure to wait until the Video log populates with something larger than “0 KB.” Then click Package Files.
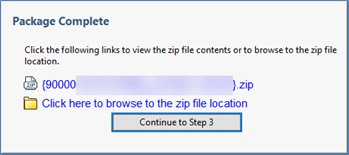
5. You will then be prompted to save the capture as a zip file. Save this somewhere convenient where you will know how to access it. After the package is complete, feel free to skip Step 3. (Step 3 is just describing the problem, and it’s usually preferred that you go ahead and describe the problem in your email or case submission instead.) When finished, send this zipped Rx package to Technical Support for review.
Creating a Pack & Go
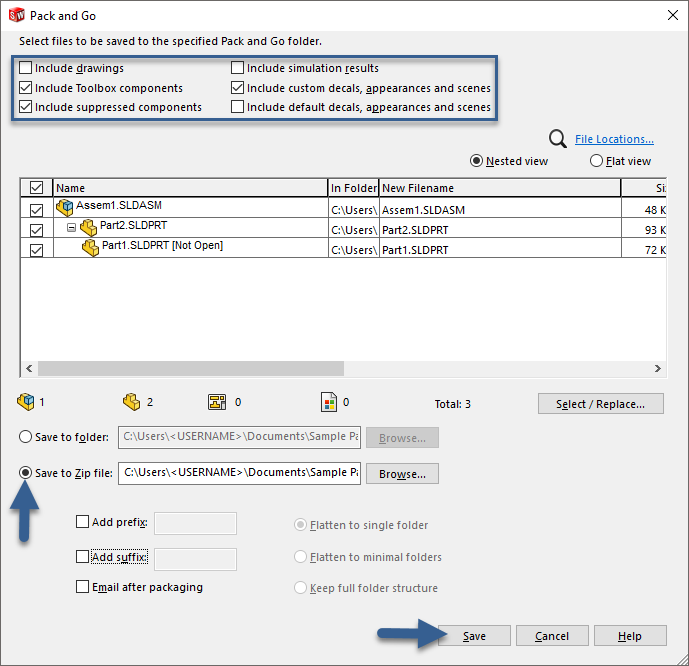
Anytime there is an issue in SOLIDWORKS that you can reproduce using a specific set of files, you’ll want to send those files to technical support for investigation. If it’s just a single-part file that has the issue with no external references, you can send that part file alone. However, if it’s a drawing or an assembly file, it is best to create a Pack and Go that captures all of the referenced sub-components so that Technical Support can open the file without any missing references. To create a Pack and Go, you will:
- Open the file in SOLIDWORKS.
- Go to File > Pack and Go.
- Choose Save to Zip File and Browse to a preferred location for saving.
- Check the boxes shown if applicable. Select Save.
Obtaining the CXPA Folder
In the event of SOLIDWORKS crashing, the CXPA logs can sometimes help Technical Support pinpoint the cause of the crash. To obtain a copy of your CXPA folder, navigate to the following location:
C:\Users\<USERNAME>\AppData\Local\SolidWorks\CXPA
The AppData folder is typically hidden, so you may need to search for it in the File Explorer by typing %LocalAppData% in the address bar. After locating the CXPA folder, right-click it and choose Send to > Compressed (Zipped) Folder, and then send this zipped folder to Technical Support.
Conclusion
Collecting relevant files and sending them to Advanced Tubular support with a description of the problem can be key to quickly addressing the issue. If files are too large to email, feel free to reach out to let us know, and we’d be happy to send you a secure upload link where you can upload your files without a size limit.

